
The MCP inspector is a developer tool for testing and debugging MCP servers.
本仓库是 官方 MCP Inspector 的 fork 版本,添加了完整的中文(简体)国际化支持。
- ✅ 完整的中英文双语支持
- ✅ 自动检测浏览器语言
- ✅ 界面内一键切换语言
- ✅ 保持与官方版本同步更新
本仓库会定期同步官方的最新更新。如果你想手动同步,请按以下步骤操作:
git remote add upstream https://github.com/modelcontextprotocol/inspector.git# 1. 获取官方最新代码
git fetch upstream
# 2. 切换到主分支
git checkout main
# 3. 合并官方更新
git merge upstream/main
# 4. 解决冲突(如果有)
# 主要关注以下文件的冲突:
# - client/src/components/Sidebar.tsx
# - client/src/main.tsx
# - client/package.json
# 5. 翻译新增的英文文本
# 将新增的英文文本添加到 client/src/locales/zh-CN/translation.json
# 6. 提交更改
git add .
git commit -m "chore: sync with upstream and update translations"
# 7. 推送到远程仓库
git push origin main注意:官方新增的功能可能会暂时显示英文,需要手动添加对应的中文翻译到 client/src/locales/zh-CN/translation.json 文件中。
- 英文翻译:
client/src/locales/en/translation.json - 中文翻译:
client/src/locales/zh-CN/translation.json
git clone https://github.com/83d/inspector.git
cd inspector
npm install
npm run build
npm link已安装过的用户,当远程仓库发生变化时,无需重新下载整个仓库。由于使用 git clone 方式获取,后续更新只需拉取增量变化即可。
cd inspector
git pull                # 拉取远程变化(只下载差异部分,很快)
npm install             # 更新依赖(没变化的话几秒钟就完成)
npm run build # 重新构建仓库根目录下提供了 update.bat 脚本,双击即可自动完成:
拉取代码 → 安装依赖 → 重新构建 → 全局安装命令
该脚本面向普通用户使用,只负责更新你当前克隆下来的仓库内容,不会自动处理官方 upstream 同步、分支合并或自动推送。
全程自动化,任何一步失败都会有提示。
| 对比 | 重新下载整个仓库 | git pull 增量更新 |
|---|---|---|
| 下载量 | 整个仓库 ~5.5MB | 只下载差异,通常几 KB |
| 耗时 | clone + install + build 全来一遍 | pull 几秒 + build |
| 操作 | 删目录 → clone → install → build | 3 条命令或双击脚本 |
中文版默认推荐使用 mcp-zh 命令,用法与官方 mcp 命令完全一致,只需将命令名从 mcp 改为 mcp-zh:
# 启动调试工具(Web UI 模式)
mcp-zh dev weather.py

# 使用 CLI 模式
mcp-zh dev weather.py --cli

# 传递环境变量
mcp-zh dev -e API_KEY=your-key weather.py

# 使用配置文件
mcp-zh dev --config mcp.json --server myserver

# 指定传输类型
mcp-zh dev --transport sse --server-url http://localhost:3000/sse
另外,为避免与官方全局命令 mcp-inspector 冲突,中文版还提供兼容命令 mcp-inspector-zh:
mcp-inspector-zh dev weather.py| 官方英文版 | 中文版 | 说明 |
|---|---|---|
mcp dev weather.py |
mcp-zh dev weather.py |
推荐使用的中文命令 |
mcp-inspector ... |
mcp-inspector-zh ... |
避免与官方全局命令冲突的兼容命令 |
mcp dev --cli server.py |
mcp-zh dev --cli server.py |
所有参数完全相同 |
零学习成本:所有子命令、参数、配置文件格式都与官方版本保持一致,唯一的区别是界面语言为中文,且兼容命令名调整为 mcp-inspector-zh 以避免与官方全局安装冲突。
下表用于记录本仓库最终对外使用的命令、所属包、暴露方式、入口文件以及推荐用途,便于后续维护时快速确认哪些命令是主入口、哪些命令只会在单独安装子包时出现。
| 命令 | 所属包 | 暴露方式 | 入口文件 | 推荐用途 |
|---|---|---|---|---|
mcp-zh |
根包 package.json |
执行 npm install -g . 后直接暴露 |
cli/build/cli.js |
推荐给最终用户使用的主命令 |
mcp-inspector-zh |
根包 package.json |
执行 npm install -g . 后直接暴露 |
cli/build/cli.js |
与 mcp-zh 等效的兼容命令 |
mcp-inspector-cli-zh |
cli/package.json |
仅在单独安装 CLI 子包时暴露,例如 npm install -g ./cli |
build/cli.js |
子包级 CLI 命令,通常不作为主安装入口 |
mcp-inspector-client-zh |
client/package.json |
仅在单独安装 client 子包时暴露,例如 npm install -g ./client |
./bin/start.js |
子包级 client 启动命令 |
mcp-inspector-server-zh |
server/package.json |
仅在单独安装 server 子包时暴露,例如 npm install -g ./server |
build/index.js |
子包级 server 启动命令 |
- 日常推荐用户使用:
mcp-zh update.ps1当前只验证mcp-zh和mcp-inspector-zh,因为它安装的是仓库根包,而不是单独安装cli/client/server子包- 如果后续继续调整命令名,需要同步检查这些位置:
package.json、各子包package.json、package-lock.json、update.ps1、README 中文说明、CI 工作流
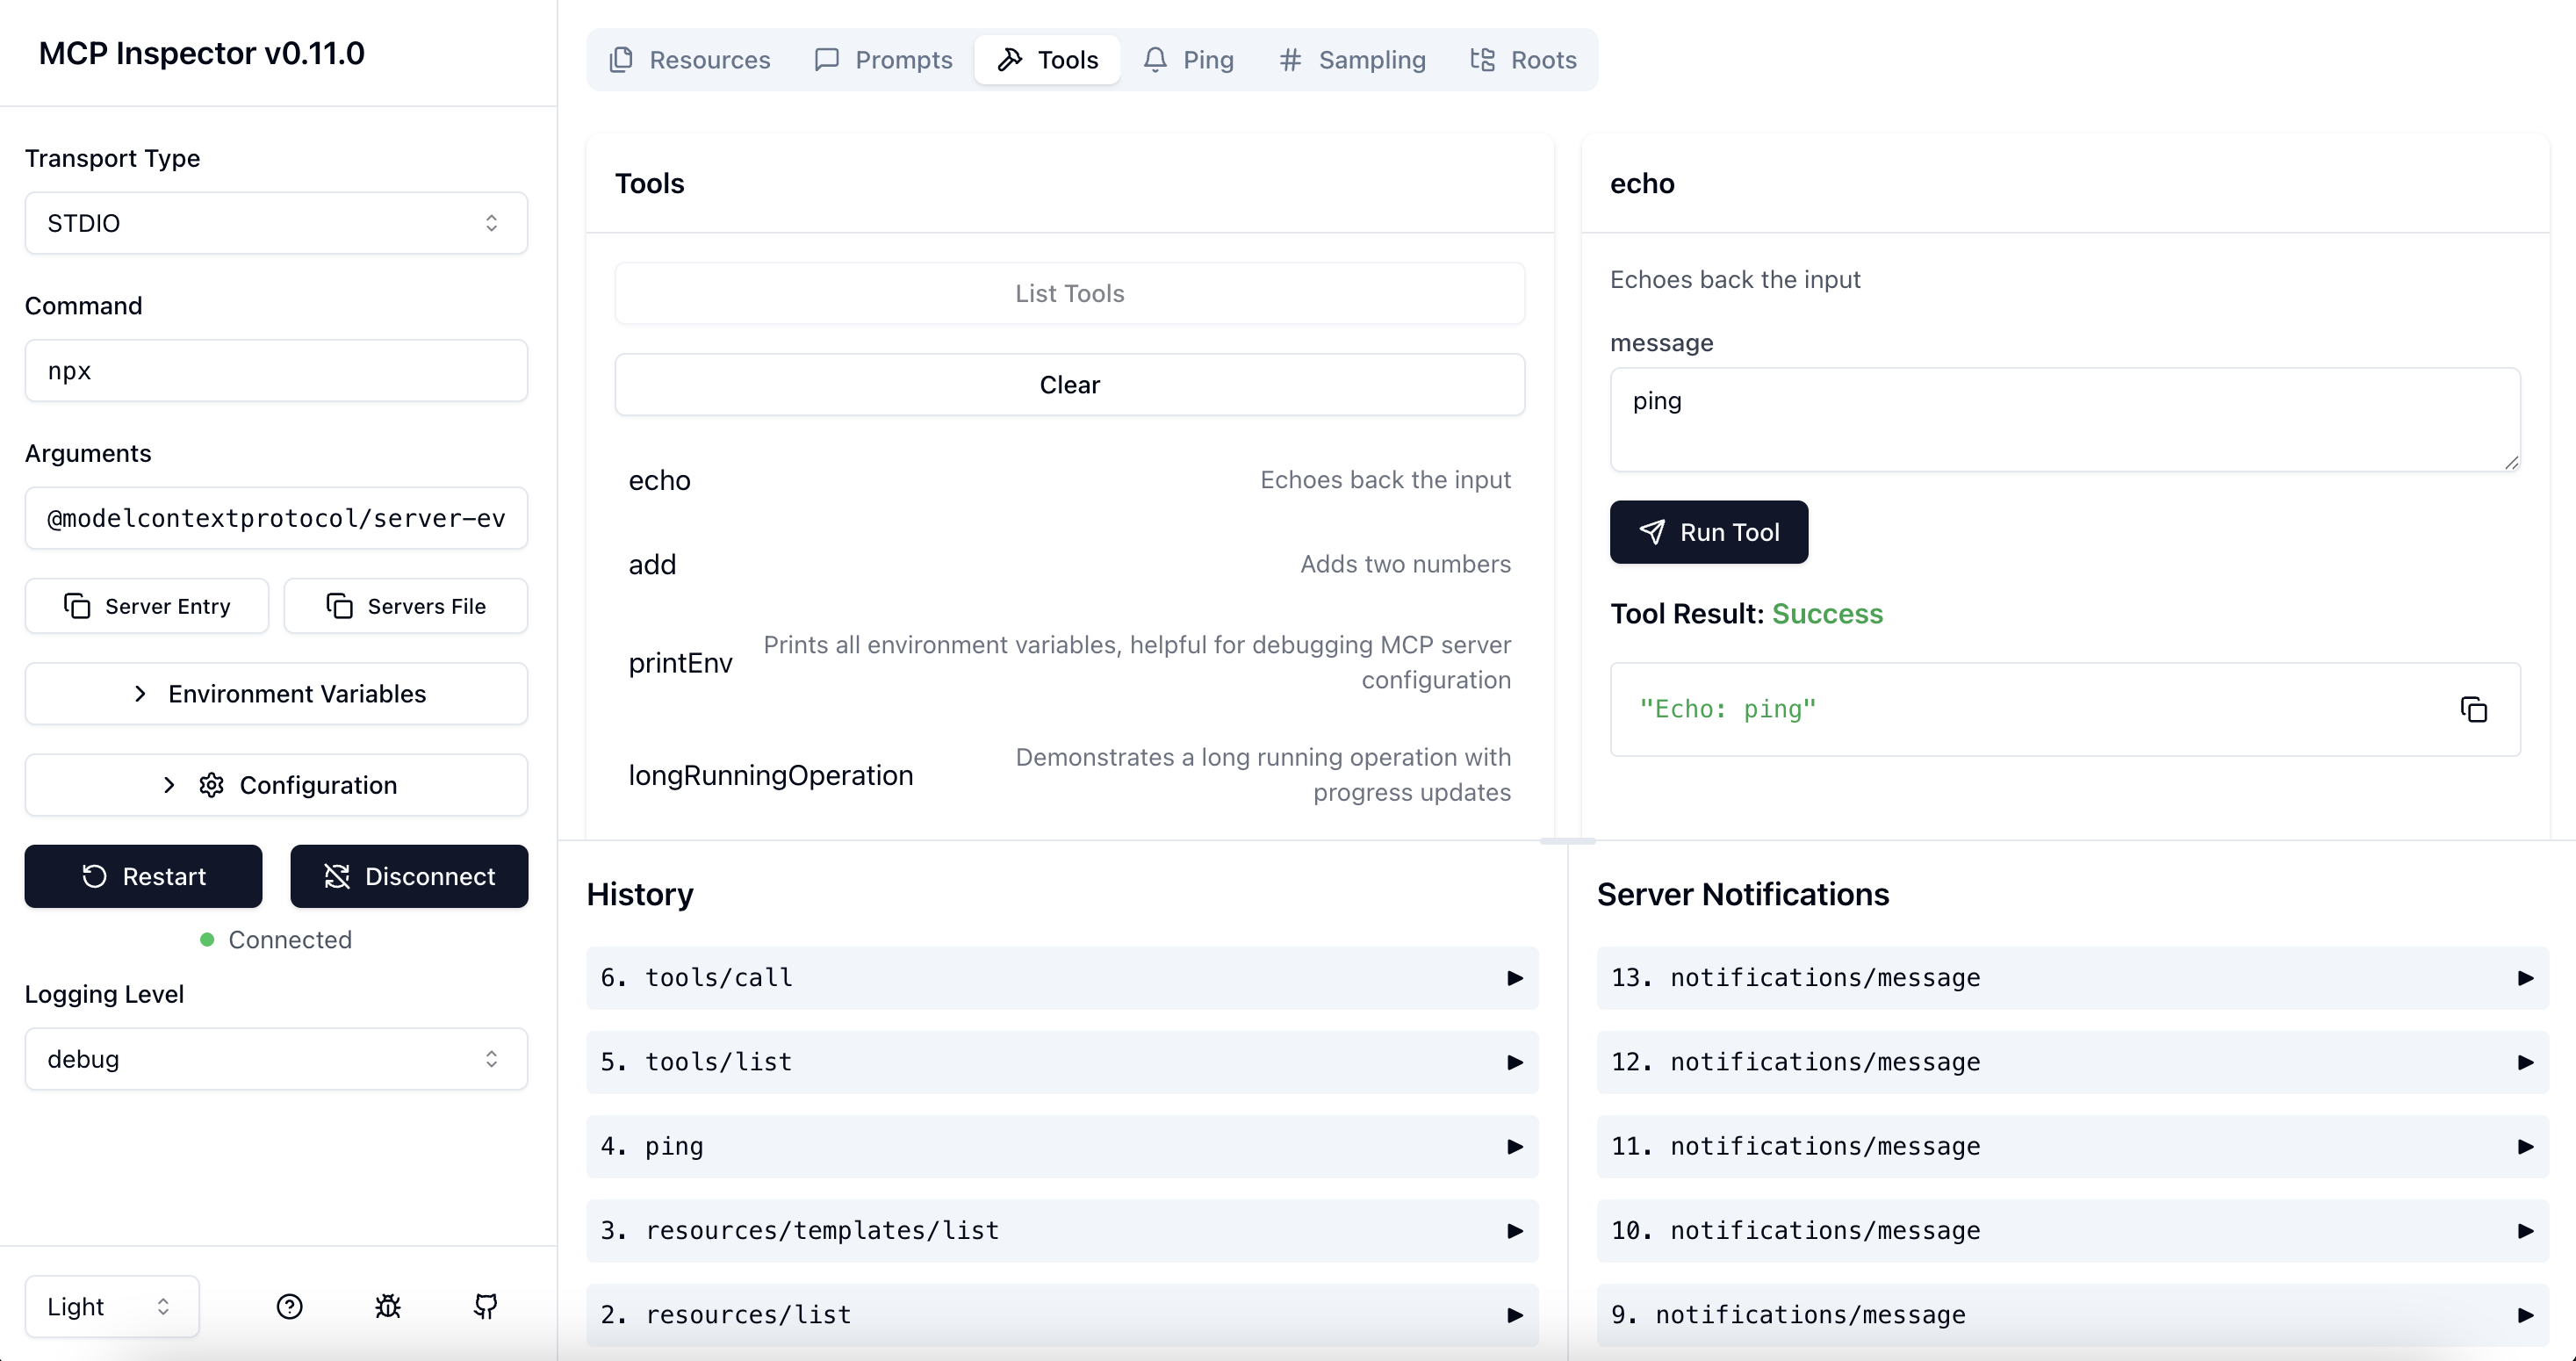
The MCP Inspector consists of two main components that work together:
- MCP Inspector Client (MCPI): A React-based web UI that provides an interactive interface for testing and debugging MCP servers
- MCP Proxy (MCPP): A Node.js server that acts as a protocol bridge, connecting the web UI to MCP servers via various transport methods (stdio, SSE, streamable-http)
Note that the proxy is not a network proxy for intercepting traffic. Instead, it functions as both an MCP client (connecting to your MCP server) and an HTTP server (serving the web UI), enabling browser-based interaction with MCP servers that use different transport protocols.
- Node.js: ^22.7.5
To get up and running right away with the UI, just execute the following:
npx @modelcontextprotocol/inspectorThe server will start up and the UI will be accessible at http://localhost:16274.
You can also start it in a Docker container with the following command:
docker run --rm \
  -p 127.0.0.1:16274:16274 \
  -p 127.0.0.1:16277:16277 \
  -e HOST=0.0.0.0 \
  -e MCP_AUTO_OPEN_ENABLED=false \
ghcr.io/modelcontextprotocol/inspector:latestTo inspect an MCP server implementation, there's no need to clone this repo. Instead, use npx. For example, if your server is built at build/index.js:
npx @modelcontextprotocol/inspector node build/index.jsYou can pass both arguments and environment variables to your MCP server. Arguments are passed directly to your server, while environment variables can be set using the -e flag:
# Pass arguments only
npx @modelcontextprotocol/inspector node build/index.js arg1 arg2

# Pass environment variables only
npx @modelcontextprotocol/inspector -e key=value -e key2=$VALUE2 node build/index.js

# Pass both environment variables and arguments
npx @modelcontextprotocol/inspector -e key=value -e key2=$VALUE2 node build/index.js arg1 arg2

# Use -- to separate inspector flags from server arguments
npx @modelcontextprotocol/inspector -e key=$VALUE -- node build/index.js -e server-flag
The inspector runs both an MCP Inspector (MCPI) client UI (default port 16274) and an MCP Proxy (MCPP) server (default port 16277). Open the MCPI client UI in your browser to use the inspector. You can customize the ports if needed:
CLIENT_PORT=8080 SERVER_PORT=9000 npx @modelcontextprotocol/inspector node build/index.jsThis fork is designed to coexist with the official MCP Inspector on the same machine.
- Official package:
@modelcontextprotocol/inspector - This fork package:
@83d/mcp-inspector-zh - Official command:
mcp-inspector - This fork commands:
mcp-zh,mcp-inspector-zh
Recommended dual-run setup:
- Official UI:
http://localhost:6274 - Official Proxy:
http://localhost:6277 - This fork UI:
http://localhost:16274 - This fork Proxy:
http://localhost:16277
This fork also enables strict proxy isolation for its own UI by default. When opened on http://localhost:16274, it stays pinned to its own proxy on http://localhost:16277 instead of following cross-instance proxy overrides from query parameters or saved browser config. This avoids accidental crossover when both the official inspector and this fork are open at the same time.
If you intentionally need to override the fork proxy target for advanced debugging, you can opt in by adding the query parameter MCP_ALLOW_UNSAFE_PROXY_OVERRIDE=true.
For more details on ways to use the inspector, see the Inspector section of the MCP docs site. For help with debugging, see the Debugging guide.
The MCP Inspector provides convenient buttons to export server launch configurations for use in clients such as Cursor, Claude Code, or the Inspector's CLI. The file is usually called mcp.json.
-
Server Entry - Copies a single server configuration entry to your clipboard. This can be added to your
mcp.jsonfile inside themcpServersobject with your preferred server name.STDIO transport example:
{
  "command": "node",
  "args": ["build/index.js", "--debug"],
  "env": {
    "API_KEY": "your-api-key",
    "DEBUG": "true"
  }
}
SSE transport example:
{
  "type": "sse",
  "url": "http://localhost:3000/events",
  "note": "For SSE connections, add this URL directly in Client"
}
Streamable HTTP transport example:
{ "type": "streamable-http", "url": "http://localhost:3000/mcp", "note": "For Streamable HTTP connections, add this URL directly in your MCP Client" } -
Servers File - Copies a complete MCP configuration file structure to your clipboard, with your current server configuration added as
default-server. This can be saved directly asmcp.json.STDIO transport example:
{
  "mcpServers": {
    "default-server": {
      "command": "node",
      "args": ["build/index.js", "--debug"],
      "env": {
        "API_KEY": "your-api-key",
        "DEBUG": "true"
      }
    }
  }
}
SSE transport example:
{
  "mcpServers": {
    "default-server": {
      "type": "sse",
      "url": "http://localhost:3000/events",
      "note": "For SSE connections, add this URL directly in Client"
    }
  }
}
Streamable HTTP transport example:
{
  "mcpServers": {
    "default-server": {
      "type": "streamable-http",
      "url": "http://localhost:3000/mcp",
      "note": "For Streamable HTTP connections, add this URL directly in your MCP Client"
    }
  }
}
These buttons appear in the Inspector UI after you've configured your server settings, making it easy to save and reuse your configurations.
For SSE and Streamable HTTP transport connections, the Inspector provides similar functionality for both buttons. The "Server Entry" button copies the configuration that can be added to your existing configuration file, while the "Servers File" button creates a complete configuration file containing the URL for direct use in clients.
You can paste the Server Entry into your existing mcp.json file under your chosen server name, or use the complete Servers File payload to create a new configuration file.
The inspector supports bearer token authentication for SSE connections. Enter your token in the UI when connecting to an MCP server, and it will be sent in the Authorization header. You can override the header name using the input field in the sidebar.
The MCP Inspector includes a proxy server that can run and communicate with local MCP processes. The proxy server should not be exposed to untrusted networks as it has permissions to spawn local processes and can connect to any specified MCP server.
The MCP Inspector proxy server requires authentication by default. When starting the server, a random session token is generated and printed to the console:
🔑 Session token: 3a1c267fad21f7150b7d624c160b7f09b0b8c4f623c7107bbf13378f051538d4

🔗 Open inspector with token pre-filled:
   http://localhost:16274/?MCP_PROXY_AUTH_TOKEN=3a1c267fad21f7150b7d624c160b7f09b0b8c4f623c7107bbf13378f051538d4
This token must be included as a Bearer token in the Authorization header for all requests to the server. The inspector will automatically open your browser with the token pre-filled in the URL.
Automatic browser opening - The inspector now automatically opens your browser with the token pre-filled in the URL when authentication is enabled.
Alternative: Manual configuration - If you already have the inspector open:
- Click the "Configuration" button in the sidebar
- Find "Proxy Session Token" and enter the token displayed in the proxy console
- Click "Save" to apply the configuration
The token will be saved in your browser's local storage for future use.
If you need to disable authentication (NOT RECOMMENDED), you can set the DANGEROUSLY_OMIT_AUTH environment variable:
DANGEROUSLY_OMIT_AUTH=true npm start🚨 WARNING 🚨
Disabling authentication with DANGEROUSLY_OMIT_AUTH is incredibly dangerous! Disabling auth leaves your machine open to attack not just when exposed to the public internet, but also via your web browser. Meaning, visiting a malicious website OR viewing a malicious advertizement could allow an attacker to remotely compromise your computer. Do not disable this feature unless you truly understand the risks.
Read more about the risks of this vulnerability on Oligo's blog: Critical RCE Vulnerability in Anthropic MCP Inspector - CVE-2025-49596
You can also set the token via the MCP_PROXY_AUTH_TOKEN environment variable when starting the server:
MCP_PROXY_AUTH_TOKEN=$(openssl rand -hex 32) npm startBy default, both the MCP Inspector proxy server and client bind only to localhost to prevent network access. This ensures they are not accessible from other devices on the network. If you need to bind to all interfaces for development purposes, you can override this with the HOST environment variable:
HOST=0.0.0.0 npm startWarning: Only bind to all interfaces in trusted network environments, as this exposes the proxy server's ability to execute local processes and both services to network access.
To prevent DNS rebinding attacks, the MCP Inspector validates the Origin header on incoming requests. By default, only requests from the client origin are allowed (respects CLIENT_PORT if set, defaulting to port 16274). You can configure additional allowed origins by setting the ALLOWED_ORIGINS environment variable (comma-separated list):
ALLOWED_ORIGINS=http://localhost:16274,http://localhost:8000 npm startThe MCP Inspector supports the following configuration settings. To change them, click on the Configuration button in the MCP Inspector UI:
| Setting | Description | Default |
|---|---|---|
MCP_SERVER_REQUEST_TIMEOUT |
Client-side timeout (ms) - Inspector will cancel the request if no response is received within this time. Note: servers may have their own timeouts | 300000 |
MCP_REQUEST_TIMEOUT_RESET_ON_PROGRESS |
Reset timeout on progress notifications | true |
MCP_REQUEST_MAX_TOTAL_TIMEOUT |
Maximum total timeout for requests sent to the MCP server (ms) (Use with progress notifications) | 60000 |
MCP_PROXY_FULL_ADDRESS |
Set this if you are running the MCP Inspector Proxy on a non-default address. Example: http://10.1.1.22:5577 | "" |
MCP_AUTO_OPEN_ENABLED |
Enable automatic browser opening when inspector starts (works with authentication enabled). Only as environment var, not configurable in browser. | true |
Note on Timeouts: The timeout settings above control when the Inspector (as an MCP client) will cancel requests. These are independent of any server-side timeouts. For example, if a server tool has a 10-minute timeout but the Inspector's timeout is set to 30 seconds, the Inspector will cancel the request after 30 seconds. Conversely, if the Inspector's timeout is 10 minutes but the server times out after 30 seconds, you'll receive the server's timeout error. For tools that require user interaction (like elicitation) or long-running operations, ensure the Inspector's timeout is set appropriately.
These settings can be adjusted in real-time through the UI and will persist across sessions.
The inspector also supports configuration files to store settings for different MCP servers. This is useful when working with multiple servers or complex configurations:
npx @modelcontextprotocol/inspector --config path/to/config.json --server everythingExample server configuration file:
{
  "mcpServers": {
    "everything": {
      "command": "npx",
      "args": ["@modelcontextprotocol/server-everything"],
      "env": {
        "hello": "Hello MCP!"
      }
    },
    "my-server": {
      "command": "node",
      "args": ["build/index.js", "arg1", "arg2"],
      "env": {
        "key": "value",
        "key2": "value2"
      }
    }
  }
}The inspector automatically detects the transport type from your config file. You can specify different transport types:
STDIO (default):
{
  "mcpServers": {
    "my-stdio-server": {
      "type": "stdio",
      "command": "npx",
      "args": ["@modelcontextprotocol/server-everything"]
    }
  }
}
SSE (Server-Sent Events):
{
  "mcpServers": {
    "my-sse-server": {
      "type": "sse",
      "url": "http://localhost:3000/sse"
    }
  }
}
Streamable HTTP:
{
  "mcpServers": {
    "my-http-server": {
      "type": "streamable-http",
      "url": "http://localhost:3000/mcp"
    }
  }
}You can launch the inspector without specifying a server name if your config has:
- A single server - automatically selected:
# Automatically uses "my-server" if it's the only one
npx @modelcontextprotocol/inspector --config mcp.json- A server named "default-server" - automatically selected:
{
  "mcpServers": {
    "default-server": {
      "command": "npx",
      "args": ["@modelcontextprotocol/server-everything"]
    },
    "other-server": {
      "command": "node",
      "args": ["other.js"]
    }
  }
}
Tip: You can easily generate this configuration format using the Server Entry and Servers File buttons in the Inspector UI, as described in the Servers File Export section above.
You can also set the initial transport type, serverUrl, serverCommand, and serverArgs via query params, for example:
http://localhost:16274/?transport=sse&serverUrl=http://localhost:8787/sse
http://localhost:16274/?transport=streamable-http&serverUrl=http://localhost:8787/mcp
http://localhost:16274/?transport=stdio&serverCommand=npx&serverArgs=arg1%20arg2
You can also set initial config settings via query params, for example:
http://localhost:16274/?MCP_SERVER_REQUEST_TIMEOUT=60000&MCP_REQUEST_TIMEOUT_RESET_ON_PROGRESS=false&MCP_PROXY_FULL_ADDRESS=http://10.1.1.22:5577
Note that if both the query param and the corresponding localStorage item are set, the query param will take precedence.
If you're working on the inspector itself:
Development mode:
npm run dev

# To co-develop with the typescript-sdk package (assuming it's cloned in ../typescript-sdk; set MCP_SDK otherwise):
npm run dev:sdk "cd sdk && npm run examples:simple-server:w"
# then open http://localhost:3000/mcp as SHTTP in the inspector.
# To go back to the deployed SDK version:
#   npm run unlink:sdk && npm i
Note for Windows users: On Windows, use the following command instead:
npm run dev:windows
Production mode:
npm run build
npm start
CLI mode enables programmatic interaction with MCP servers from the command line, ideal for scripting, automation, and integration with coding assistants. This creates an efficient feedback loop for MCP server development.
npx @modelcontextprotocol/inspector --cli node build/index.jsThe CLI mode supports most operations across tools, resources, and prompts. A few examples:
# Basic usage
npx @modelcontextprotocol/inspector --cli node build/index.js

# With config file
npx @modelcontextprotocol/inspector --cli --config path/to/config.json --server myserver

# List available tools
npx @modelcontextprotocol/inspector --cli node build/index.js --method tools/list

# Call a specific tool
npx @modelcontextprotocol/inspector --cli node build/index.js --method tools/call --tool-name mytool --tool-arg key=value --tool-arg another=value2

# Call a tool with JSON arguments
npx @modelcontextprotocol/inspector --cli node build/index.js --method tools/call --tool-name mytool --tool-arg 'options={"format": "json", "max_tokens": 100}'

# List available resources
npx @modelcontextprotocol/inspector --cli node build/index.js --method resources/list

# List available prompts
npx @modelcontextprotocol/inspector --cli node build/index.js --method prompts/list

# Connect to a remote MCP server (default is SSE transport)
npx @modelcontextprotocol/inspector --cli https://my-mcp-server.example.com

# Connect to a remote MCP server (with Streamable HTTP transport)
npx @modelcontextprotocol/inspector --cli https://my-mcp-server.example.com --transport http --method tools/list

# Connect to a remote MCP server (with custom headers)
npx @modelcontextprotocol/inspector --cli https://my-mcp-server.example.com --transport http --method tools/list --header "X-API-Key: your-api-key"

# Call a tool on a remote server
npx @modelcontextprotocol/inspector --cli https://my-mcp-server.example.com --method tools/call --tool-name remotetool --tool-arg param=value

# List resources from a remote server
npx @modelcontextprotocol/inspector --cli https://my-mcp-server.example.com --method resources/list| Use Case | UI Mode | CLI Mode |
|---|---|---|
| Server Development | Visual interface for interactive testing and debugging during development | Scriptable commands for quick testing and continuous integration; creates feedback loops with AI coding assistants like Cursor for rapid development |
| Resource Exploration | Interactive browser with hierarchical navigation and JSON visualization | Programmatic listing and reading for automation and scripting |
| Tool Testing | Form-based parameter input with real-time response visualization | Command-line tool execution with JSON output for scripting |
| Prompt Engineering | Interactive sampling with streaming responses and visual comparison | Batch processing of prompts with machine-readable output |
| Debugging | Request history, visualized errors, and real-time notifications | Direct JSON output for log analysis and integration with other tools |
| Automation | N/A | Ideal for CI/CD pipelines, batch processing, and integration with coding assistants |
| Learning MCP | Rich visual interface helps new users understand server capabilities | Simplified commands for focused learning of specific endpoints |
When implementing or modifying tool input parameter handling in the Inspector:
- Omit optional fields with empty values - When processing form inputs, omit empty strings or null values for optional parameters, UNLESS the field has an explicit default value in the schema that matches the current value
- Preserve explicit default values - If a field schema contains an explicit default (e.g.,
default: null), and the current value matches that default, include it in the request. This is a meaningful value the tool expects - Always include required fields - Preserve required field values even when empty, allowing the MCP server to validate and return appropriate error messages
- Defer deep validation to the server - Implement basic field presence checking in the Inspector client, but rely on the MCP server for parameter validation according to its schema
These guidelines maintain clean parameter passing and proper separation of concerns between the Inspector client and MCP servers.
This project is licensed under the MIT License—see the LICENSE file for details.